Bez kategorii
Aerodynamics Under Control, Part 3: Mustang S550 with a Rear Wing in CFD Analysis
Why Does the Rear Wing Matter So Much?
In the case of the Mustang S550, the rear section of the body was one of the key aerodynamic areas from the very beginning. Even in stock configuration, we could see that the fastback silhouette generated noticeable lift and disturbed airflow behind the car.
The canards from Part 2 began controlling the airflow at the front, but they did not solve the issue at the rear of the body.
The rear wing works exactly where the stock fastback shape starts to lose control over the airflow. Its role is not only to “add downforce.” It also changes the way air leaves the vehicle, affects the pressure distribution around the rear section of the body, and reorganizes the wake behind the car.
In practice, this means the rear wing is not just an add-on mounted at the end of the vehicle. It becomes an active element that starts organizing one of the most problematic aerodynamic zones of the entire body.
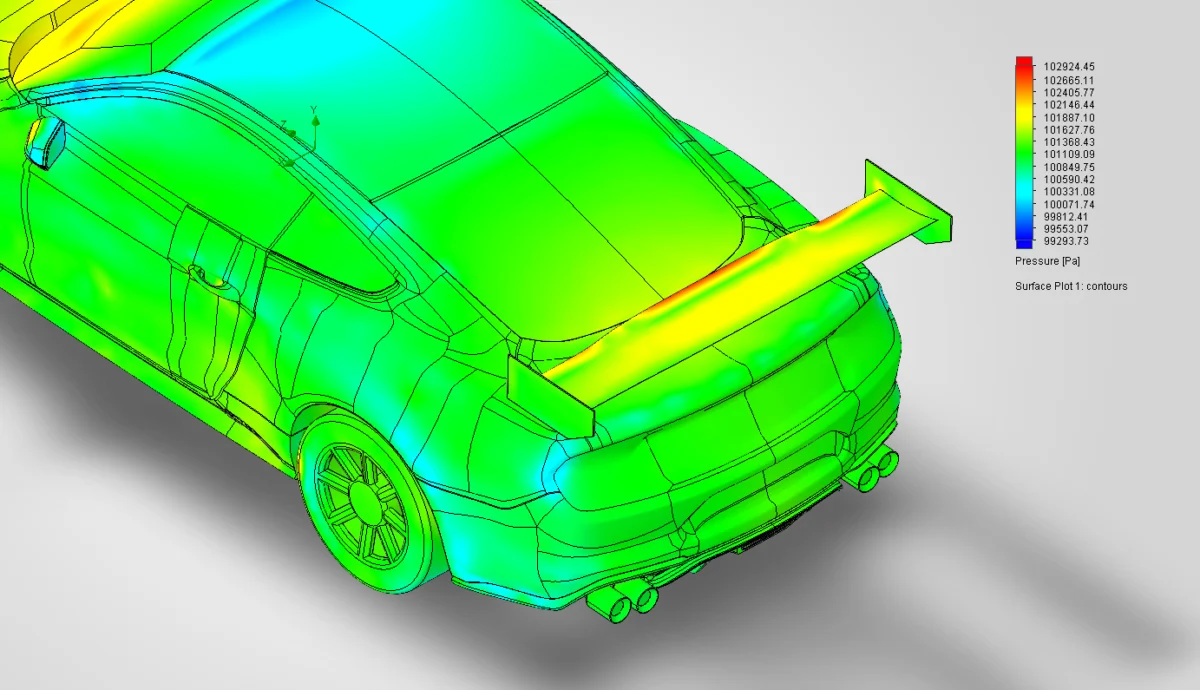
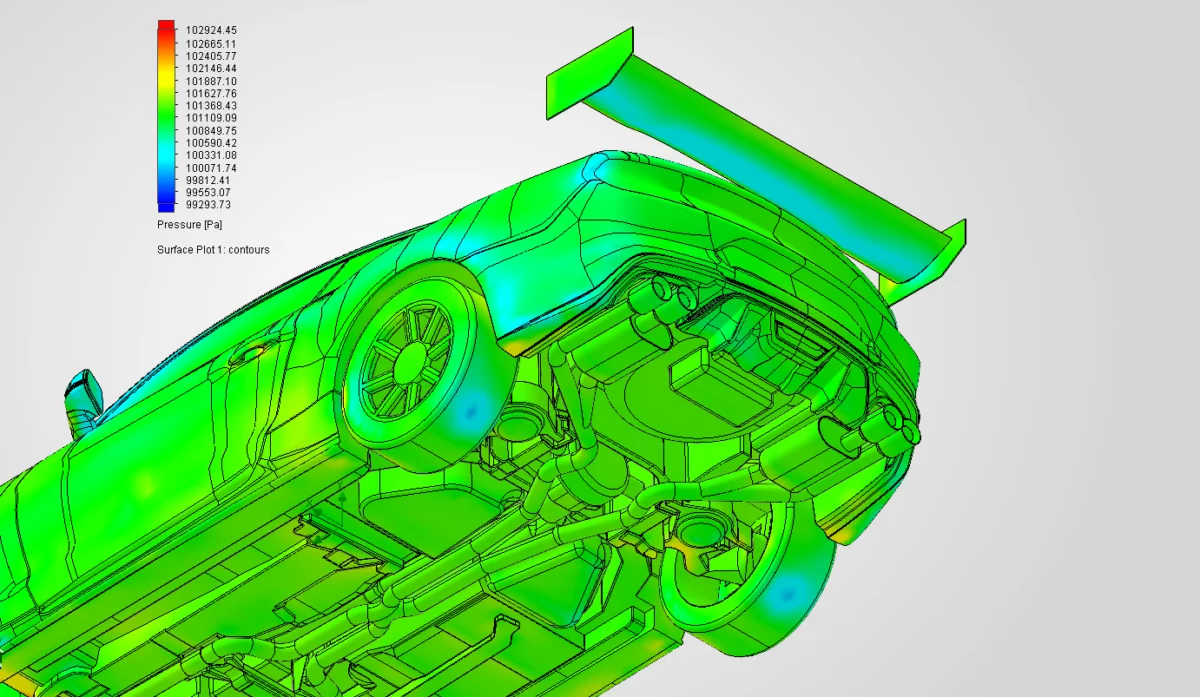
What Does the Pressure Map on the Wing and Rear Section Show?
The pressure maps clearly show that the rear wing becomes an aerodynamically active surface. A visible pressure distribution appears across the wing, showing that it takes over part of the aerodynamic work from the rear section of the body.
In the three-quarter and top views, it is clear that the rear of the car is no longer just a passive ending of the fastback silhouette. The wing directly interacts with the airflow leaving the roof and rear glass.
This is important because, in the stock configuration, the airflow in this area tended to become unstable. The rear wing introduces a new working surface in this zone, allowing part of the airflow energy to be used in a more controlled way.
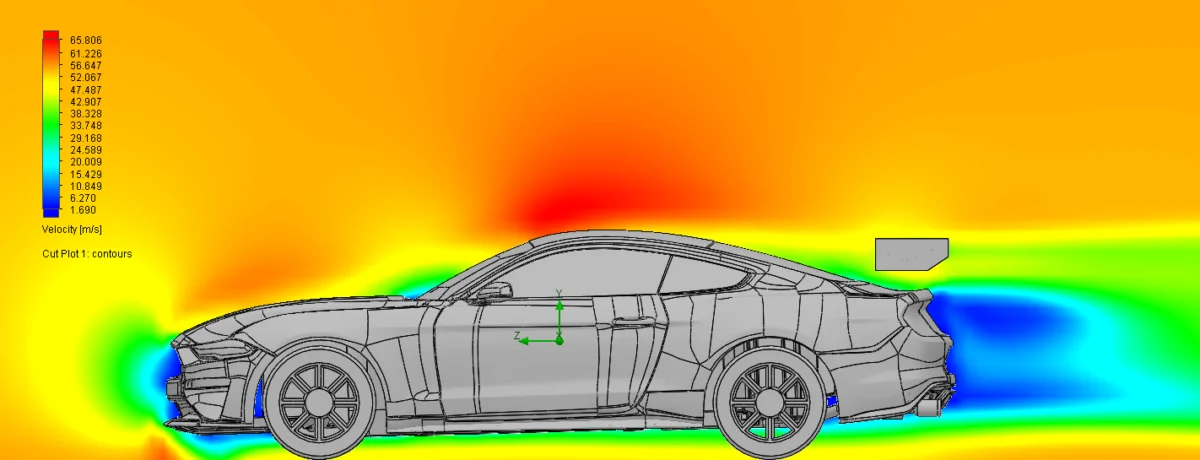
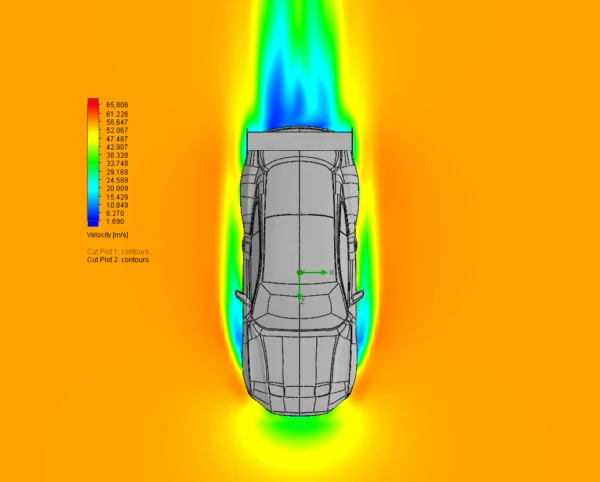
What Does the Airflow Velocity Map Show?
The velocity maps are especially important in this part because they show not only the car itself, but also what happens behind it.
In the side section view, we can see that the rear wing strongly affects the airflow leaving the roof and rear bodywork. A low-velocity region still exists behind the car, but its character changes. The airflow is no longer simply being dropped off the rear of the fastback body. It starts to be shaped by the wing as well.
The top view also shows how the airflow behind the wing forms a clear zone behind the vehicle. This matters because the wing affects not only vertical aerodynamic force, but also the structure of the wake behind the car.
That is exactly why a rear wing usually has a greater influence on the whole vehicle than components that work only locally. It operates in an area that was one of the main aerodynamic limitations of the stock Mustang.
Rear Wing and Lift: The Biggest Change So Far
The most important conclusion from this part is simple: the rear wing alone reduces lift much more significantly than canards alone.
This makes sense, because the wing works exactly where the stock fastback body had one of its biggest aerodynamic issues – at the rear of the car, behind the roof, rear glass, and trunk lid. This is where the airflow begins to lose structure, and where a noticeable wake forms behind the vehicle.
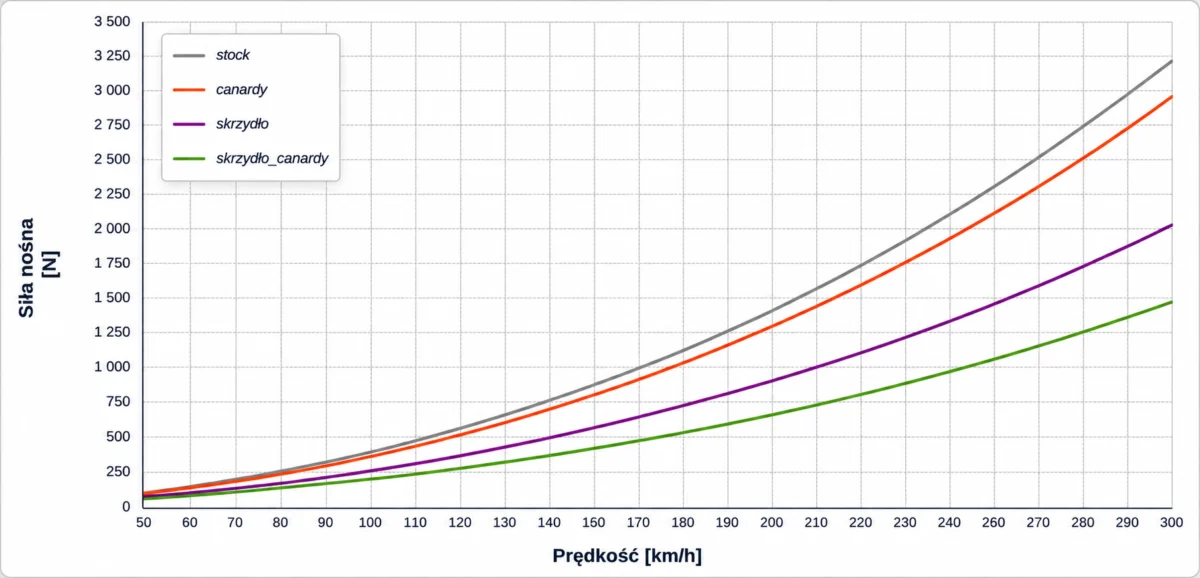
The comparison shows that the rear wing configuration clearly reduces lift across the entire speed range:
| Speed | Stock Mustang S550 | Mustang with Rear Wing | Difference |
|---|---|---|---|
| 100 km/h | 359 N | 228 N | -131 N |
| 150 km/h | 807 N | 512 N | -295 N |
| 200 km/h | 1434 N | 910 N | -524 N |
| 250 km/h | 2241 N | 1422 N | -819 N |
| 300 km/h | 3227 N | 2048 N | -1179 N |
At 200 km/h, the stock Mustang generated 1434 N of lift, which equals approximately 146 kg of aerodynamic lift. After adding only the rear wing, this value dropped to 910 N, or around 93 kg of lift.
That means a difference of 524 N, or roughly 53 kg at 200 km/h.
This is no longer a cosmetic change. Compared to the stock configuration, the rear wing reduces lift by approximately 36.5%. In practice, this means the rear section of the car starts to actively counteract the aerodynamic unloading of the body at high speed.
However, one important thing needs to be made clear: the car still generates positive lift. The wing significantly reduces the problem, but it does not yet turn the entire vehicle into a full downforce-generating configuration. This distinction matters, because in aerodynamics it is very easy to oversimplify things. The rear wing improves the situation, but it does not fully solve the overall aerodynamic balance of the car.
Drag: The Price of a More Active Rear End
Such a significant reduction in lift does not come for free. The rear wing operates directly in the airflow, so it naturally increases aerodynamic drag.
The drag comparison looks as follows:
| Speed | Stock Mustang S550 | Mustang with Rear Wing | Difference |
| 100 km/h | 431 N | 463 N | +32 N |
| 150 km/h | 969 N | 1041 N | +72 N |
| 200 km/h | 1722 N | 1851 N | +129 N |
| 250 km/h | 2691 N | 2892 N | +201 N |
| 300 km/h | 3875 N | 4165 N | +290 N |
At 200 km/h, drag increased from 1722 N to 1851 N, which is a difference of 129 N. That is approximately 7.5% more compared to the stock configuration.
This is where the purpose of this modification becomes clear. The increase in drag is noticeable, but relatively moderate compared to the reduction in lift. At 200 km/h, we add around 129 N of drag, while reducing lift by approximately 524 N.
This shows that the rear wing in this configuration is not just a visually aggressive add-on. It is actively working aerodynamically and creates a much larger change in vertical force than the drag increase alone might suggest.
In a track-focused car, this trade-off can make sense, because high-speed stability, rear-end predictability, and better control through fast sections are often more important than minimizing aerodynamic drag at all costs.
What Does the Underbody View Show?
The underbody view reminds us of something that is easy to overlook in aerodynamics: the rear of the car does not end at the trunk lid and wing.
Airflow underneath the vehicle still matters. The underbody, rear axle area, and the zone behind the rear wheels continue to contribute to the overall aerodynamic balance.
This is important because the rear wing works high up, in the upper airflow region, but its effect must always be understood in the context of the entire vehicle. The body, underbody, and wake behind the car form one connected system. If we really want to understand what the wing does, we cannot look only at the wing itself. We need to look at the whole car.
What Does the Mustang S550 with Rear Wing Analysis Tell Us?
The rear wing-only configuration shows several very important things.
First, the wing works exactly where the stock fastback silhouette had its biggest issue – at the rear of the car and in the wake region behind the vehicle.
Second, its influence on the overall vertical aerodynamic force is much stronger than that of the canards alone. At 200 km/h, canards reduced lift compared to stock by around 107 N, while the rear wing alone reduces it by approximately 524 N. This means the rear wing is a much more significant component for the overall aerodynamic stability of the Mustang S550.
Third, the reduction in lift comes at the cost of increased aerodynamic drag. In this case, the drag increase at 200 km/h is around 129 N, or approximately 7.5%. This is a natural consequence of more active aerodynamics.
Fourth, the rear wing alone is still not a complete solution. It improves the rear of the car, but it does not fully solve the overall aerodynamic balance. To evaluate the final effect, we need to see what happens when the front and rear aero elements work together as one system.
What’s Next?
Part three shows that the rear wing is not just a visually striking component, but primarily a real tool for controlling airflow in the most problematic zone of the Mustang S550.
This is a much stronger step than front-end correction alone. But aerodynamics are not about making one component work hard. They are about making the entire car work as a complete system.
That is why in the next part, we will connect both worlds: front and rear.
Canards and the rear wing will be analyzed in one configuration to see how the Mustang S550 behaves when its aerodynamics begin to work as a full system.
Because the best results do not appear when one component does a lot.
They appear when all components start working together.